1. Imagery
This guide provides step-by-step instructions on how to deploy your imagery in TytonAI, upload imagery files, and configure imagery settings for analysis.
Overview
The Upload Imagery module allows users to add imagery to the project either by uploading new images or selecting existing ones. These images serve as input data for AI classification processes.
Key Features
- Upload Raster Files: Supports uploading tiled or single
.tifraster datasets. - Band Assignment: Specify band configurations such as Red, Green or Blue.
- AOI Integration: Clip imagery to your Area of Interest via shapefile selection.
- Capture Metadata: Add details like imagery name, category and date of capture.
- Flexible File Selection: Drag and drop, browse or select from previously uploaded project files.
- Deploy for Analysis: Finalise input settings and deploy imagery into the project.
Step-by-Step Workflow
1. Open the Upload Imagery Panel
- In your project, click the "Imagery" button from the Wizard Bar on the right side of your screen.
2. Choose how you want to add imagery

When you imagery icon from the workflow wizard, you will see three options:
Add New Imagery
- Upload new raster imagery files to the project. This is the most common option when deploying a new orthomosaic or satellite image for analysis.
Search Existing
- Select imagery that already exists in the TytonAI imagery library. This allows you to reuse imagery that has previously been uploaded without needing to upload the files again.
Add Bands to Existing Imagery
-
Attach additional bands (such as multispectral or derived bands) to imagery that is already stored in the project.
-
For deploying a new orthomosaic or raster dataset, select Add New Imagery.
Add New Imagery
Use this when uploading a new orthomosaic or raster dataset into the project.
Search Existing
Use this when imagery has already been uploaded to TytonAI and you want to reuse it without uploading the files again.
Add Bands to Existing Imagery
Use this when you want to attach additional spectral bands or derived layers to imagery that already exists in the project.
3a. Add New Imagery - Select imagery
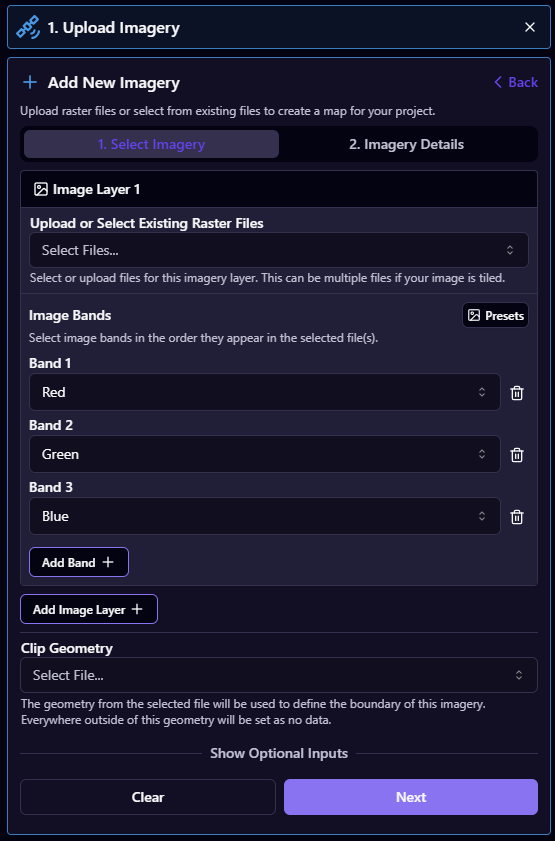
After selecting Add New Imagery, the imagery deployment wizard will open.
Upload or Select Existing Raster Files
Upload the raster files that will be used to create the imagery layer for your project.
- Click Select Files to upload your raster imagery in .tif format
- Multiple files can be uploaded and selected if your imagery is tiled.
Image Bands
Define the bands in the order they appear in the raster file.
Typical RGB imagery will use:
- Band 1 — Red
- Band 2 — Green
- Band 3 — Blue
Additional bands can be added if your imagery contains multispectral or additional channels.
You can also click Add Band to manually define additional bands if required.
Clip Geometry (Optional)
- This is required if yor imagery does not have an Alpa Band to define your imagery boundary
- Under Clip Geometry, click to select your
.zipshapefile defining the Area of Interest. - Browse existing files or upload a new shapefile.
- The selected shapefile will define the spatial bounds for your imagery deployment.
.zip format.Please follow Creating a shapefile in QGIS for more info.
3b. Add New Imagery - Imagery Details
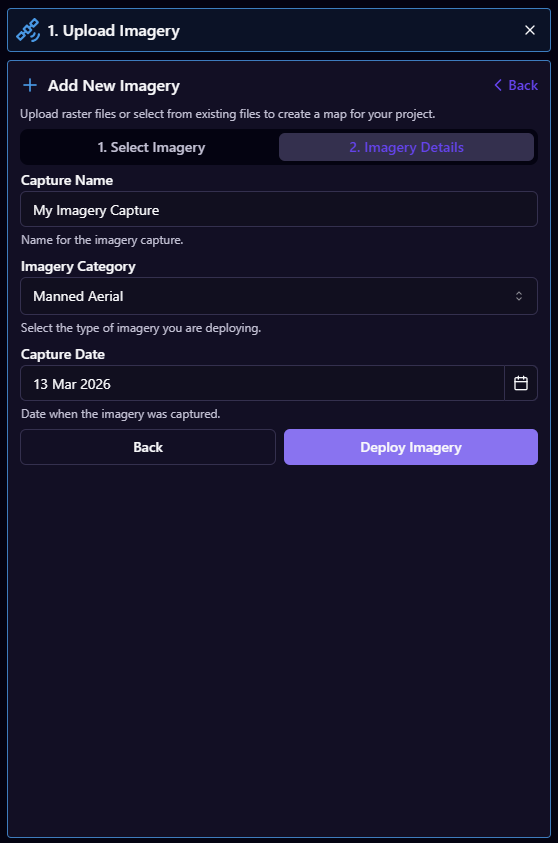
- Capture Name: Give your imagery a unique, descriptive name.
- Imagery Category: Select from:
- UAV (0.5cm – 5cm resolution)
- Manned Aerial (5cm – 30cm resolution)
- Satellite (30cm - 50cm resolution)
- Capture Date: Use the date picker to enter the capture date of your imagery.
4. Deploy Imagery
- Click Deploy to finalise the imagery setup and load it into your project for processing.
TytonAI supports only one projection per project, mismatched spatial references will cause errors or prevent data from being processed correctly. Always double-check your EPSG codes before uploading. Please ensure your clipped geometry is also in the same projection. follow Reprojecting a shapefile in QGIS for more info.
Selecting Existing Imagery
- Click Search Existing.
- A file browser appears displaying previously uploaded image captures.
- Use the search bar to filter results.
- Select an image and confirm by clicking Select AOI shapefile.
Not adding the correct band types to your rasters will cause the image upload to fail.
To check the band types of your imagery:
In QGIS:
- From the top toolbar navigate to Raster -> Miscellaneous -> Raster Information.
- Choose your raster as your Input layer and Select "Run".
- Search for 'ColorInterp=' in the logs to find the number of bands and your band types.
In ArcGIS Pro:
- Right-click the raster layer in the Contents pane.
- Select "Properties".
- Go to the "Source" tab.
- Look under "Raster Information" > "Band Count".
- Each band's details will be listed below.
Common Combinations:
- 3 bands = RGB
- 4 bands = RGBA or RGBI (check metadata to confirm)
- 5 bands = RGBIA